Wednesday, 4 March 2015

Week 2: Camera Use: Aperture (AV) 50mm

Camera Setting: Aperture Priority (AV)


Landscape photo with a wide DOF – 50mm Lense 1.8

F22 1/15s ISO100 50mm

The photo is in focus but becomes a bit fuzzy with the trees in the back area not as sharp.

Photographs with three elements: F8 and F22

Foreground, Middle Ground and Background


F1/8 1/2000s ISO100 50mm FOREGROUND

F1/8 1/2000s ISO100 50mm MIDDLE GROUND

F1/8 1/2000s ISO100 50mm BACKGROUND


Foreground in focus, Middle Ground starting to go out of focus, Background out of focus. 


Middle Ground in focus, Foreground and Background out of focus. 


Background in focus, Foreground and Middle Ground out of focus, a hazy effect in the foreground.


PIC 1:  F1/22 1/15 ISO100 50mm ORIGINAL – FOREGROUND in focus
and the rest of the picture. Wide DOF.


PIC 2:  F1/18.0 1/25 ISO100 50mm – MIDDLE GROUND in focus.
Cannot see any difference between picture 1 and picture 2 depth of field the same. Wide DOF.

PIC 3:  F1/22.0 1/15 ISO100 50mm – BACKGROUND in focus.
Cannot see any difference between picture 1, picture 2 and picture 3 depth of field the same.


'Environmental Portrait' with everything in the frame in focus

F1/22 1/40 ISO100 50mm Wide DOF, slower shutter speed, tripod used.

'Portrait' with a narrow DOF and a wide DOF

 F1.8 1/2500s ISO100 50mm


Narrow DOF creates a cool effect with the subject in focus and everything else out of focus.


 F22 1/30s ISO100 50mm


Wide DOF the subject and everything else is in focus.
Slower shutter, camera on a tripod.


'Object' with a narrow DOF and a wide DOF

 F1.8 1/6400s ISO100 50mm


Narrow DOF middle ground in focus, front and background out of focus. Narrow DOF.


 F22 1/30s ISO100 50mm


Wide DOF the object in focus background a bit fuzzy. Camera balanced on the tree branch.


'Portrait' subject standing close to the camera F1.8

F1.8 1/3200 ISO100, the subject is in focus background out of focus narrow DOF.
F1.8 1/4000 ISO100, the subject has moved 10 steps away, wide DOF.
The subject is in focus. 

Handy Info: A handy APP to have is the Depth of field 

                      Calculator.

depth of field calculator

Reference: http://www.cambridgeincolour.com/tutorials/depth-of-field.htm

CALCULATING DEPTH OF FIELD

In order to calculate the depth of field, one needs to first decide on an appropriate value for the maximum allowable circle of confusion. This is based on both the camera type (sensor or film size), and on the viewing distance / print size combination. Needless to say, knowing what this will be ahead of time often isn't straightforward. Try out the depth of field calculator tool to help you find this for your specific situation.

DEPTH OF FOCUS & APERTURE VISUALIZATION

Another implication of the circle of confusion is the concept of depth of focus (also called the "focus spread"). It differs from depth of field because it describes the distance over which light is focused at the camera's sensor, as opposed to the subject:
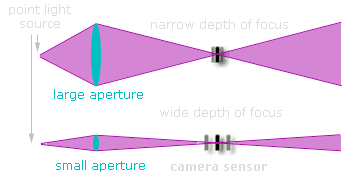
Visualization: Aperture vs Depth of Field
Diagram depicting depth of focus versus camera aperture. The purple lines comprising the edge of each shaded region represent the extreme angles at which light could potentially enter the aperture. The interior of the purple shaded regions represents all other possible angles.
The key concept is this: when an object is in focus, light rays originating from that point converge at a point on the camera's sensor. If the light rays hit the sensor at slightly different locations (arriving at a disc instead of a point), then this object will be rendered as out of focus — and increasingly so depending on how far apart the light rays are.

Sunday, 1 March 2015

Week 1: Camera Use Artists Anna & Berhard Blume & Richard Avedon

Shutter: Blur and Frozen Movement


anna and bernhard blume:
Anna Blume and Bernhard (Johannes) Blume where born in 1937.  
Anna was born in, Westphalia and Bernhard Blume was born in Dortmund.
                      Reference: http://www.nrw-museum.de

stephensheffield.wordpress.com  1515 × 715    The artists live and work together in Cologne.


stephensheffield.wordpress.com   640 × 490      Kitchen Frenzy, 1986


It is amazing to see how much Anna and Bernhard Bluma, expanded the boundaries of photography.

They put lots of effort and thought into capturing the frozen movement, blurring  images. Both looked to be having a lot of fun doing their photos. The black and white images are amazing tones and contrasts. 


Doing photography for them took more than just composing a photo they were creating a piece of art and having fun expressing their feelings and joy.


www.photography-now.com  570 × 219       1977-78, Silver gelatine print

Selected Literature

Anna & Bernhard Blume, de-konstruktiv, Ausst.-Kat. Museum am Ostwall Dortmund, hg. v. K. Wettengl,
D. Strauß, Bielefeld / Leipzig 2006

Anna & Bernhard Blume, Das Glück ist ohne Pardon – Joy knows no mercy, Polaroids: Ausst.-Kat. Kunsthalle Göppingen, hg.v. W. Meyer, Göppingen 2003

Honnef, K. (Hg.): Transzendentaler Konstruktivismus, Ausst.-Kat. Kunsthalle Bremen, Bremen 1995


// Honnef, K. (Hg.): Anna und Bernhard Blume, 3 Bde., Köln 1992 — 95

Wieland, A. (Hg.): Anna & Bernhard Blume, Großfotoserien 1985 — 1990, Ausst.-Kat., Rhein. Landesmuseum Bonn, Köln 1992 


Richard Avedon:

Richard Avedon was one of the most important and prolific photographers of the second half of the twentieth century, and in the eyes of many photography and fashion specialists, he was the most important fashion photographer of all time. In a career spanning sixty years he showed himself capable of almost constant stylistic reinvention, yet in retrospect his oeuvre also demonstrated a remarkable coherence and strength that far surpassed the narrow confines of fashion photography.


Reference: http://www.my-fashionbank.com/articles/article19.html

Reference: Encyclopedia of clothing gang fashion

Source: Fashion Bank 

Category: Photography

Tags to article Tags to article: Avedon, Photography, Famous photographers


Picture 1:  www.bellazon.com500 × 614


Picture 2: S+ART: Television
startstudioarts.si.edu297 × 300Search by image.
Detail of orchids in a planter, from Portrait of Yinli, Prince Guo (1697-1738)


Picture 3: Drew Photo Jessica: Avedon Project
drewphotojessicae.blogspot.com 1067 × 1600 Search by image.

These portraits are intended to bring a more real connection rather than posed and smiling. This is another draft of portraits to go into the final collection of my Richard Avedon segment.


Picture 4: Les Maitres de la photographie 
– Les plus grands photographes du Monde
www.photogriffon.com446 × 561Search by image

Louis Amstrong - Rhode Island - 1955 © 
Richard Avedon


Richard Avedon:
What amazing impression in portrait photography.  The clarity of the eyes and depth of the images.
Each image has a different pose and portrays different feelings.

Picture 1: Beauty and laughter.

Picture 2: Motherhood and absolute joy.

Picture 3: Sadness in the eyes no emotion.

Picture 4: Surprise and brilliance in reflection and mood of the
                moment.


Week 1: Camera Use Shutter (TV) & Self Directed Tasks

Camera Use Week 1: SHUTTER


Portrait of Stephanie:
F6.3  1/80th  ISO100 (no tripod)

The background was over exposing a little, bright sunlight.

File opened in Camera Raw the levels changed,
and the photo cropped most of the background focusing on the area in the shade.


 F6.3  1/60th  ISO100 (no tripod)

Not as much over exposing of the background.

File opened in Camera Raw the levels changed, the photo was cropped for better position.

Photo not crisp, it would have being better with a tripod.


F10  1/30th  ISO100 24-70mm@70mm

Photo exposed better, clear and detailed image.

F22 1"  ISO100 24-70mm@35mm

Photo over exposed less light needed. Very bright and sunny day, we moved inside for better quality photos.


Pic 1: Different angle over exposed    Pic 2: ISO increased over exposed    Pic 3: Shutter 2" a little less
                                                                                                                                over exposed

Movement: Shutter Speed

F10 1/60th  ISO100 24-70mm@35mm

F22 1"  ISO100 24-70mm@28mm   No Tripod, camera shake and a blurred background.

F22 1"  ISO100 24-70mm@28mm   Tripod used, background in focus and movement, cropped in photoshop.

F22 1"  ISO100 24-70mm@24mm   No Tripod used, whole scene blurred, cropped in photoshop.


F22 1/8th  ISO100 24-70mm@28mm   Tripod used, background in focus and movement, cropped in photoshop.  Camera would not take the shoot at 1/10th?

Panning Photos: 

F10 1/40th  ISO160 24-70mm@70mm   No Tripod. Auckland City,  Civic Centre waiting for the rain to stop.

F14 1/30th  ISO100 24-70mm@24mm    Tripod. Auckland City, corner Queen St & Wellesley St. 

PIC 1:  F22 1/10th  ISO160 24-70mm@28mm  
Tripod. Auckland City, corner Queen St & Wellesley St. (Blurry and and in focus)

PIC 2:  F22 1/10th  ISO160 24-70mm@28mm  
Tripod. Auckland City, corner Queen St & Wellesley St. (Blurry and out of focus)

PIC 3:  F22 1/10th  ISO160 24-70mm@28mm  
Tripod. Auckland City, corner Queen St & Wellesley St. (Blurry and out of focus)

Night Photos: 


F22 1/5th  ISO2500 24-70mm@24mm   Tripod. Pakuranga. (Tree in focus and I am blurry)


F22 1/5th  ISO10000 24-70mm@24mm   Tripod. Pakuranga. (Tree in focus and I am blurred)


F22 1/8th  ISO10000 24-70mm@24mm   Tripod. Pakuranga. (Tree in focus and I am blurred)

F22 1/8th  ISO2500 24-70mm@24mm   Tripod. Pakuranga. (Painting with a 2x torches)


 F22 1/6th  ISO2500 24-70mm@24mm   Tripod. Pakuranga. (Painting with a torch)


SHUTTER SPEED EXERCISE: Movement


F8.0 1/250 ISO124 24-70mm@24mm The image is a bit dark more exposure needed.


Photo changed in Camera RAW, exposer increased.


F8.0 1/125 ISO125   24-70mm@24mm Movement in the Middle ground, foreground and background in focus. Good reflection of the little girl and the buildings in the background.


F2.8 1/60 ISO 400 24 24-70mm@61mm Low light and no tripod, reflection in both sides of the image.


F4.0 1/30 ISO 100 24 24-70mm@35mm No tripod, camera shake image all blurry. Use a tripod, 1/60 or below if possible.


F5.0 1/5 ISO200 24 24-70mm@30mm No tripod allowed,  Art Gallery in Auckland, movement and reflection of the lights mirrored on the kids.