Camera Setting: Aperture Priority (AV)
Landscape photo with a wide DOF – 50mm Lense 1.8
 |
| F22 1/15s ISO100 50mm |
The photo is in focus but becomes a bit fuzzy with the trees in the back area not as sharp.
Photographs with three elements: F8 and F22
Foreground, Middle Ground and Background
 |
| F1/8 1/2000s ISO100 50mm FOREGROUND |
 |
| F1/8 1/2000s ISO100 50mm MIDDLE GROUND |
 |
| F1/8 1/2000s ISO100 50mm BACKGROUND |
Foreground in focus, Middle Ground starting to go out of focus, Background out of focus.
Middle Ground in focus, Foreground and Background out of focus.
Background in focus, Foreground and Middle Ground out of focus, a hazy effect in the foreground.
%2BF1.8.jpg)

PIC 1: F1/22 1/15 ISO100 50mm ORIGINAL – FOREGROUND in focus
and the rest of the picture. Wide DOF.
%2BF22.jpg)

PIC 2: F1/18.0 1/25 ISO100 50mm – MIDDLE GROUND in focus.
Cannot see any difference between picture 1 and picture 2 depth of field the same. Wide DOF.

PIC 3: F1/22.0 1/15 ISO100 50mm – BACKGROUND in focus.
Cannot see any difference between picture 1, picture 2 and picture 3 depth of field the same.
'Environmental Portrait' with everything in the frame in focus

F1/22 1/40 ISO100 50mm Wide DOF, slower shutter speed, tripod used.
'Portrait' with a narrow DOF and a wide DOF
 |
| F1.8 1/2500s ISO100 50mm |
Narrow DOF creates a cool effect with the subject in focus and everything else out of focus.
 |
| F22 1/30s ISO100 50mm |
Wide DOF the subject and everything else is in focus.
Slower shutter, camera on a tripod.
'Object' with a narrow DOF and a wide DOF
 |
| F1.8 1/6400s ISO100 50mm |
Narrow DOF middle ground in focus, front and background out of focus. Narrow DOF.
 |
| F22 1/30s ISO100 50mm |
Wide DOF the object in focus background a bit fuzzy. Camera balanced on the tree branch.
'Portrait' subject standing close to the camera F1.8
 |
| F1.8 1/3200 ISO100, the subject is in focus background out of focus narrow DOF. |
 |
| F1.8 1/4000 ISO100, the subject has moved 10 steps away, wide DOF. The subject is in focus. |
Handy Info: A handy APP to have is the Depth of field
Calculator.
depth of field calculator
Reference: http://www.cambridgeincolour.com/tutorials/depth-of-field.htm
CALCULATING DEPTH OF FIELD
In order to calculate the depth of field, one needs to first decide on an appropriate value for the maximum allowable circle of confusion. This is based on both the camera type (sensor or film size), and on the viewing distance / print size combination. Needless to say, knowing what this will be ahead of time often isn't straightforward. Try out the depth of field calculator tool to help you find this for your specific situation.
DEPTH OF FOCUS & APERTURE VISUALIZATION
Another implication of the circle of confusion is the concept of depth of focus (also called the "focus spread"). It differs from depth of field because it describes the distance over which light is focused at the camera's sensor, as opposed to the subject:
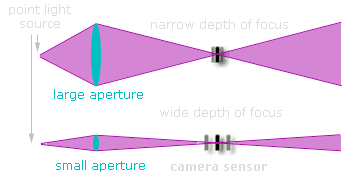
Diagram depicting depth of focus versus camera aperture. The purple lines comprising the edge of each shaded region represent the extreme angles at which light could potentially enter the aperture. The interior of the purple shaded regions represents all other possible angles.
The key concept is this: when an object is in focus, light rays originating from that point converge at a point on the camera's sensor. If the light rays hit the sensor at slightly different locations (arriving at a disc instead of a point), then this object will be rendered as out of focus — and increasingly so depending on how far apart the light rays are.
No comments:
Post a Comment